

Channels
Set up an auto-reply for non-working hours
Auto Follow-up
Reminders respect the AI Employee’s schedule
Persona
Behavior instructions for specific hours
Notifications
Alerts arrive even outside working hours
Video guide
A short video: how to set up an AI Employee’s schedule and how to use a copy of the AI Employee to run different modes for daytime and nighttime work.
Section structure
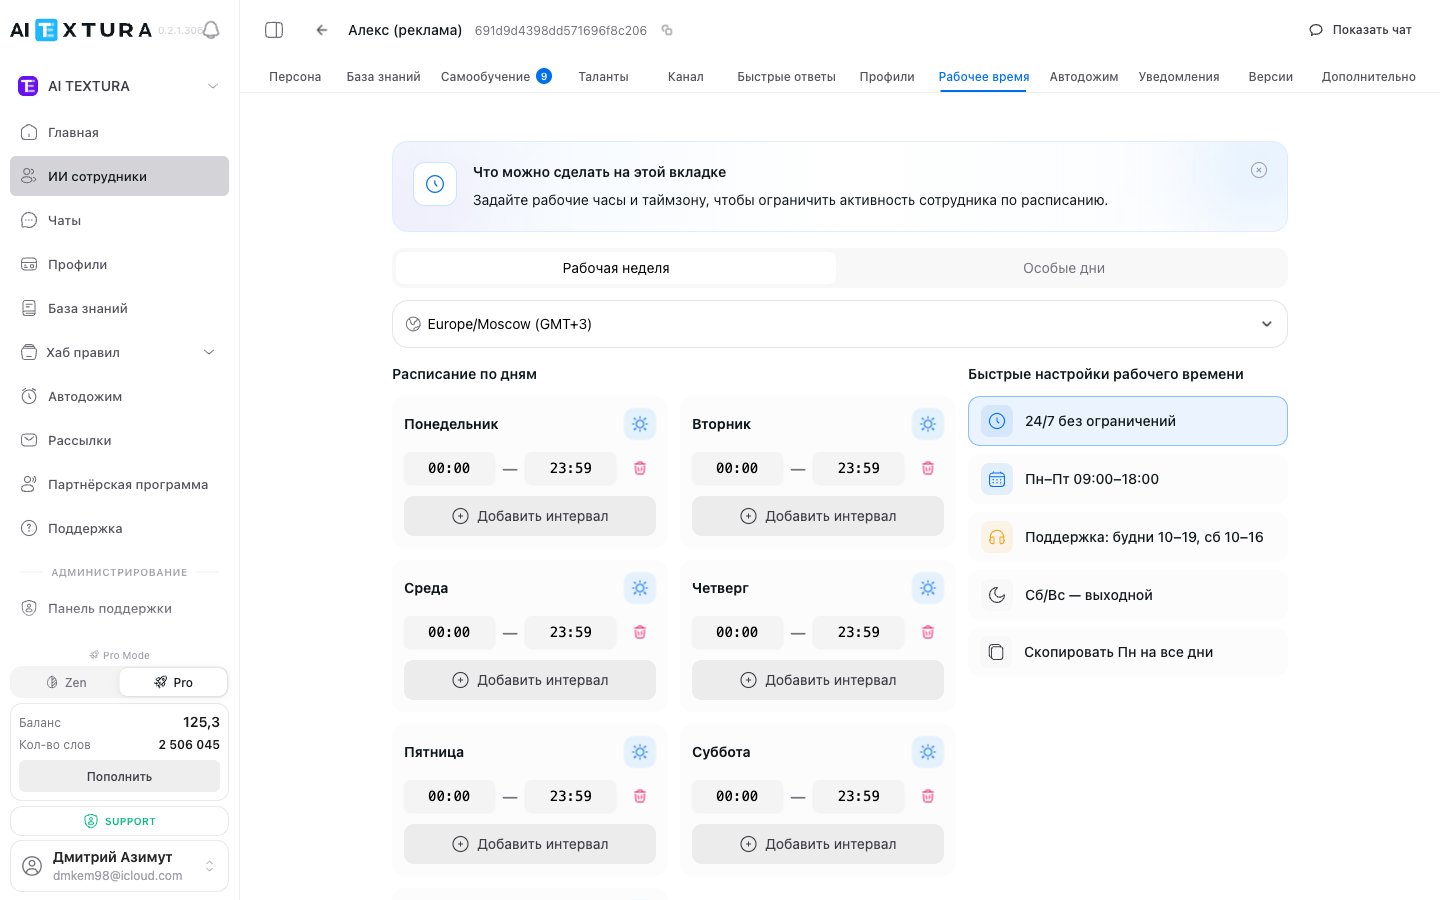
The section has two sub-tabs:The schedule applies to all channels connected to the AI Employee. If you need a different schedule for different channels, create separate AI Employees.
Work week
Time zone
At the top of the section is the Working time zone selector. The AI Employee’s entire schedule is tied to the selected time zone. The default is Europe/Moscow (GMT+3).Daily schedule
Below the time zone selector is the schedule for each day of the week, Monday through Sunday. Each day has the following controls:
Each day can have several intervals. This is handy for breaks — for example, two intervals, 09:00–13:00 and 14:00–18:00, create a lunch break from 13:00 to 14:00.
Quick settings (presets)
Below the schedule is the Quick working hours settings block — a set of ready-made templates:Presets are a starting point. After applying one, you can adjust any day manually.
Special days
The Special days sub-tab lets you set exceptions to the main schedule: public holidays, company days off, and days with a modified schedule. Special days always take priority over the main work week schedule. For each special day, specify:- Date — a specific calendar day
- Parameters — a full day off or a modified schedule with different working hours
Behavior outside working hours
When a customer writes to the AI Employee outside working hours, there are two possible outcomes:- The AI Employee doesn’t reply — the message stays unanswered until the next working interval begins.
- The AI Employee sends an auto-reply — a preconfigured message with information about working hours.
If you don’t set up working hours, the AI Employee runs 24/7 by default — all days are active from 00:00 to 23:59.
Step-by-step instructions
Setting up a standard work week
1
Open the section
Go to the AI Employee you need and open the Working Hours tab.
2
Choose a time zone
Make sure the correct time zone is selected in the Working time zone selector.
3
Set working hours
For each working day, set the Start time and End time.
4
Disable days off
For days off, click the sun icon next to the day name to make them non-working.
5
Save
Click Save. Changes take effect immediately.
Adding a lunch break
1
Find the day
In the work week schedule, find the day you want to add a break to.
2
Set the first interval
Set the working time before the break — for example, 09:00–13:00.
3
Add a second interval
Click Add interval and set the working time after the break — for example, 14:00–18:00.
4
Save
Click Save. Now the AI Employee won’t reply to messages from 13:00 to 14:00.
Adding a special day (holiday)
1
Go to the sub-tab
Open the Special days sub-tab.
2
Add an entry
Click the button to add a new special day.
3
Set the parameters
Set the date and choose the type: a full day off or a modified schedule with different hours.
4
Save
Click Save.
Turning on 24/7 mode
1
Open the section
Go to the Working Hours tab.
2
Apply the preset
In the quick settings block, click 24/7, no limits.
3
Save
Click Save. All days of the week become active from 00:00 to 23:59.
All parameters
How it relates to other sections
FAQ
What happens when a customer writes outside working hours?
What happens when a customer writes outside working hours?
The AI Employee doesn’t reply to messages or sends a preconfigured auto-reply. The exact behavior depends on the settings in the Channel section.
Can I set different schedules for different channels?
Can I set different schedules for different channels?
No. The schedule is set at the AI Employee level and applies to all of its channels at once. If you need a different schedule, create separate AI Employees.
What takes priority -- the main schedule or a special day?
What takes priority -- the main schedule or a special day?
Special days always take priority over the main work week schedule.
How quickly do changes take effect?
How quickly do changes take effect?
Immediately after saving. You don’t need to wait or reload anything.
Can I set a break within a working day?
Can I set a break within a working day?
Yes. Use the Add interval button to split the working day into several periods. For example: 09:00–13:00 and 14:00–18:00.
Do I need to update special days every year?
Do I need to update special days every year?
Yes. Holidays added for the current year don’t carry over to the next one automatically. Review and update the list at the start of each year.
If I don't set up working hours, will the AI Employee work 24/7?
If I don't set up working hours, will the AI Employee work 24/7?
Yes. By default, all days are active from 00:00 to 23:59, which means round-the-clock mode with no days off.
How do I set up an auto-reply for non-working hours?
How do I set up an auto-reply for non-working hours?
You set the auto-reply text not here but in the Channel section. The Working Hours tab only controls the schedule.