> ## Documentation Index
> Fetch the complete documentation index at: https://aitextura.mintlify.site/llms.txt
> Use this file to discover all available pages before exploring further.
# Telegram
> Connect a Telegram bot or personal account to your AI employee. The bot is created via @BotFather; a personal account requires Telegram Premium. Personal/Group channel types, AI inline buttons, message buffer, and history auto-clear are all supported.
 What a channel is and how it works in AI Textura
WhatsApp, Instagram, VK, Avito
Telegram messages inside a CRM deal card
Telegram via Bitrix24 open channels
## Telegram bot
The fastest and free way to connect your AI employee to customers. You will need a bot token issued by @BotFather.
### Step 1. Create a bot in Telegram
Open Telegram and search for **@BotFather** — the official Telegram bot with a blue checkmark.
Press **/start**, then send the **/newbot** command.
* **Name** — any display name (e.g., "JawaBerry Glamping").
* **Username** — one Latin word, may contain `_`, must end with `bot` (e.g., `JawaBerry_Glamping_bot`).
BotFather will send a token like `123456789:ABCdefGhIJKlmNoPQRsTUVwxyZ`.\
**Copy it in full** — you will need it in the next step.
Do not share the token with third parties — it is the access key to your bot.
### Step 2. Connect the bot in AI Textura
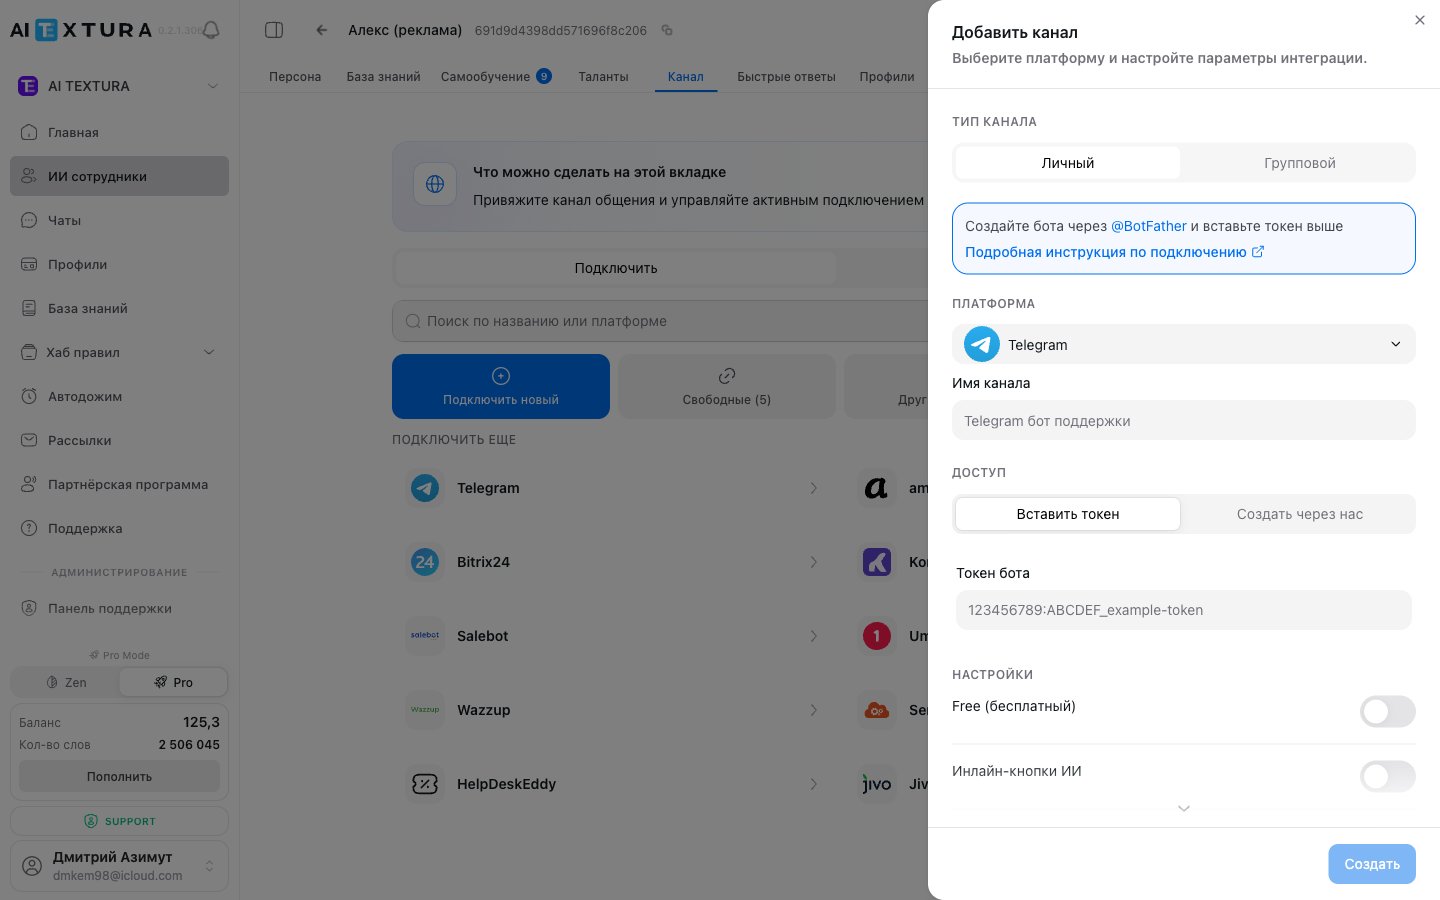
Go to [AI Employees](/en/guides/ai-employees) → select the agent → **Channel** tab → **Connect new** sub-tab.
In the platform list, find **Telegram** and click on it.
In the side panel, switch to the **Create** tab.
* **Channel type**: Personal (one-on-one) or Group (for group chats). See below.
* **Platform**: already selected — Telegram.
* **Channel name**: any name convenient for you.
* **Bot token**: paste the token from BotFather.
Click **Connect**. The bot will appear in the **Connected** tab and start receiving messages.
If you are connecting a group channel, make sure Privacy Mode is disabled in @BotFather — otherwise the bot won't see messages in the group.
### Step 3. Customize the bot's appearance (recommended)
Go back to Telegram → @BotFather → **My Bots** → select your bot → **Edit Bot**:
* **Description** — a short description (up to 512 characters). Shown when the bot is opened for the first time.
* **About** — a very short line, visible in the bot's profile.
* **Photo** — add a logo or photo for recognition.
***
## Channel types: Personal and Group
When you create a Telegram channel, AI Textura asks for the **channel type**:
| Type | When to choose | Specifics |
| ------------ | ----------------------------------------------------------------------------------------------------------------- | ---------------------------------------------------------------------------------------- |
| **Personal** | The bot replies to each customer in a personal chat (one-to-one). The most common scenario for support and sales. | Each chat is a separate customer. The customer profile is maintained individually. |
| **Group** | The bot operates inside a Telegram group chat (e.g., a company team chat or group support). | The bot sees messages from every participant. Privacy Mode must be disabled for the bot. |
The channel type **is selected when you connect** and cannot be changed afterwards. If you need a different mode, disconnect the channel and create it again.
For most business tasks (customer support, booking, sales), the **Personal** channel is the right choice. Pick Group only if you really need the bot in a shared chat.
***
## Additional channel settings
After connecting, open the Telegram channel in the **Connected** tab — several important toggles are available there.
### AI inline buttons
The agent can **build quick-select buttons on the fly** in its reply — for example, "Yes / No," "Booking / Menu / Contacts," or answer options for a clarifying question.
* **When to enable**: if you want to speed up the conversation and reduce how much the customer has to type.
* **When to disable**: if the bot has open-ended conversations without clear scenarios — the buttons would just get in the way.
AI buttons are not a static menu — they are dynamic options the AI proposes based on context. To make them appear consistently, mention the relevant scenarios in the [agent's persona](/en/guides/persona).
### Message buffer
If the customer types one thought across several consecutive messages, the buffer makes the bot **wait** and reply once the customer is done.
* **Buffer time** — 3-5 seconds is recommended.
* Without the buffer, the bot replies to the first message without waiting for the rest.
Learn more: [Channels — Message buffer](/en/channels#message-buffer).
### Auto-clear history
Chat messages are automatically deleted on a schedule — saving space and helping you comply with customer data privacy policies.
* **When to enable**: if your company policy or local regulations don't allow long conversation retention.
* **When to disable**: if you analyze chats manually, train your FAQ from history, or run long-running deals that need full context.
Auto-clear cannot be undone. Before enabling it, make sure important data (customer profiles, CRM notes) is stored elsewhere.
### Active / Free / other toggle settings
The shared channel settings (Active, Free, Channel type) are described on the overview page — see [Channels → Connected channel settings](/en/channels#connected-channel-settings).
***
## Personal Telegram account
If you want the AI employee to respond on behalf of your **personal** Telegram account (rather than a separate bot), this is also possible.
A **Telegram Premium** subscription is required to connect a personal account. The setup happens on the Telegram side, not in AI Textura.
First create and connect a bot using the steps above — it is required for the system to work.
On your phone, go to **Settings** → **Telegram for Business**.
Open the **Chatbots** section and pick the bot connected to AI Textura.
Specify which chats the bot should respond to — **all messages** or with certain chats excluded.
After this, the bot processes messages, but the customer sees replies from your personal account.
***
## Bot vs Personal account
| | Telegram bot | Personal account |
| -------------------------- | ------------------------------ | ------------------------------- |
| **What the customer sees** | A separate bot with a username | Your personal profile |
| **Requires Premium** | No | Yes |
| **Setup** | AI Textura only | AI Textura + Telegram |
| **Group chats** | Supported | Not supported |
| **Recommended for** | Most tasks | Personal customer communication |
***
## Voice messages
Telegram is the only channel that supports voice messages. If a customer sends a voice message, the AI:
* automatically transcribes it,
* replies with text,
* and can **voice the reply** if text-to-speech is enabled in the employee settings.
In the employee settings, you can choose the voice and adjust speed, timbre, and pauses.
***
## FAQ
No. The type is chosen once at creation. To change it, disconnect the channel and reconnect with the new type.
The most common reason is Privacy Mode being enabled in @BotFather. Open @BotFather → My Bots → your bot → **Bot Settings** → **Group Privacy** → **Turn off**. After this, the bot will start seeing group members' messages.
The AI generates buttons based on conversation context. To make them appear more consistently, describe in the agent's instructions the scenarios where buttons are needed (e.g., "When clarifying check-in dates, suggest 3-4 options as buttons").
No. Auto-clear deletes messages permanently. If you need to keep critical dialog data, configure customer profile fields in the agent or set up a CRM integration so important information is recorded automatically.
What a channel is and how it works in AI Textura
WhatsApp, Instagram, VK, Avito
Telegram messages inside a CRM deal card
Telegram via Bitrix24 open channels
## Telegram bot
The fastest and free way to connect your AI employee to customers. You will need a bot token issued by @BotFather.
### Step 1. Create a bot in Telegram
Open Telegram and search for **@BotFather** — the official Telegram bot with a blue checkmark.
Press **/start**, then send the **/newbot** command.
* **Name** — any display name (e.g., "JawaBerry Glamping").
* **Username** — one Latin word, may contain `_`, must end with `bot` (e.g., `JawaBerry_Glamping_bot`).
BotFather will send a token like `123456789:ABCdefGhIJKlmNoPQRsTUVwxyZ`.\
**Copy it in full** — you will need it in the next step.
Do not share the token with third parties — it is the access key to your bot.
### Step 2. Connect the bot in AI Textura
Go to [AI Employees](/en/guides/ai-employees) → select the agent → **Channel** tab → **Connect new** sub-tab.
In the platform list, find **Telegram** and click on it.
In the side panel, switch to the **Create** tab.
* **Channel type**: Personal (one-on-one) or Group (for group chats). See below.
* **Platform**: already selected — Telegram.
* **Channel name**: any name convenient for you.
* **Bot token**: paste the token from BotFather.
Click **Connect**. The bot will appear in the **Connected** tab and start receiving messages.
If you are connecting a group channel, make sure Privacy Mode is disabled in @BotFather — otherwise the bot won't see messages in the group.
### Step 3. Customize the bot's appearance (recommended)
Go back to Telegram → @BotFather → **My Bots** → select your bot → **Edit Bot**:
* **Description** — a short description (up to 512 characters). Shown when the bot is opened for the first time.
* **About** — a very short line, visible in the bot's profile.
* **Photo** — add a logo or photo for recognition.
***
## Channel types: Personal and Group
When you create a Telegram channel, AI Textura asks for the **channel type**:
| Type | When to choose | Specifics |
| ------------ | ----------------------------------------------------------------------------------------------------------------- | ---------------------------------------------------------------------------------------- |
| **Personal** | The bot replies to each customer in a personal chat (one-to-one). The most common scenario for support and sales. | Each chat is a separate customer. The customer profile is maintained individually. |
| **Group** | The bot operates inside a Telegram group chat (e.g., a company team chat or group support). | The bot sees messages from every participant. Privacy Mode must be disabled for the bot. |
The channel type **is selected when you connect** and cannot be changed afterwards. If you need a different mode, disconnect the channel and create it again.
For most business tasks (customer support, booking, sales), the **Personal** channel is the right choice. Pick Group only if you really need the bot in a shared chat.
***
## Additional channel settings
After connecting, open the Telegram channel in the **Connected** tab — several important toggles are available there.
### AI inline buttons
The agent can **build quick-select buttons on the fly** in its reply — for example, "Yes / No," "Booking / Menu / Contacts," or answer options for a clarifying question.
* **When to enable**: if you want to speed up the conversation and reduce how much the customer has to type.
* **When to disable**: if the bot has open-ended conversations without clear scenarios — the buttons would just get in the way.
AI buttons are not a static menu — they are dynamic options the AI proposes based on context. To make them appear consistently, mention the relevant scenarios in the [agent's persona](/en/guides/persona).
### Message buffer
If the customer types one thought across several consecutive messages, the buffer makes the bot **wait** and reply once the customer is done.
* **Buffer time** — 3-5 seconds is recommended.
* Without the buffer, the bot replies to the first message without waiting for the rest.
Learn more: [Channels — Message buffer](/en/channels#message-buffer).
### Auto-clear history
Chat messages are automatically deleted on a schedule — saving space and helping you comply with customer data privacy policies.
* **When to enable**: if your company policy or local regulations don't allow long conversation retention.
* **When to disable**: if you analyze chats manually, train your FAQ from history, or run long-running deals that need full context.
Auto-clear cannot be undone. Before enabling it, make sure important data (customer profiles, CRM notes) is stored elsewhere.
### Active / Free / other toggle settings
The shared channel settings (Active, Free, Channel type) are described on the overview page — see [Channels → Connected channel settings](/en/channels#connected-channel-settings).
***
## Personal Telegram account
If you want the AI employee to respond on behalf of your **personal** Telegram account (rather than a separate bot), this is also possible.
A **Telegram Premium** subscription is required to connect a personal account. The setup happens on the Telegram side, not in AI Textura.
First create and connect a bot using the steps above — it is required for the system to work.
On your phone, go to **Settings** → **Telegram for Business**.
Open the **Chatbots** section and pick the bot connected to AI Textura.
Specify which chats the bot should respond to — **all messages** or with certain chats excluded.
After this, the bot processes messages, but the customer sees replies from your personal account.
***
## Bot vs Personal account
| | Telegram bot | Personal account |
| -------------------------- | ------------------------------ | ------------------------------- |
| **What the customer sees** | A separate bot with a username | Your personal profile |
| **Requires Premium** | No | Yes |
| **Setup** | AI Textura only | AI Textura + Telegram |
| **Group chats** | Supported | Not supported |
| **Recommended for** | Most tasks | Personal customer communication |
***
## Voice messages
Telegram is the only channel that supports voice messages. If a customer sends a voice message, the AI:
* automatically transcribes it,
* replies with text,
* and can **voice the reply** if text-to-speech is enabled in the employee settings.
In the employee settings, you can choose the voice and adjust speed, timbre, and pauses.
***
## FAQ
No. The type is chosen once at creation. To change it, disconnect the channel and reconnect with the new type.
The most common reason is Privacy Mode being enabled in @BotFather. Open @BotFather → My Bots → your bot → **Bot Settings** → **Group Privacy** → **Turn off**. After this, the bot will start seeing group members' messages.
The AI generates buttons based on conversation context. To make them appear more consistently, describe in the agent's instructions the scenarios where buttons are needed (e.g., "When clarifying check-in dates, suggest 3-4 options as buttons").
No. Auto-clear deletes messages permanently. If you need to keep critical dialog data, configure customer profile fields in the agent or set up a CRM integration so important information is recorded automatically.